Tuesday, September 29, 2026

Troubleshooting missing emails in Gmail

A Guide to Recovering Missing Gmail Emails

Emails that suddenly vanish from your Gmail inbox can be a massive inconvenience, especially if you know they were in your inbox and have vanished all of a sudden. Usually, this typically happens because they may have been archived, deleted, filtered away, or moved by a connected app, a filter, or an IMAP rule.

If you cannot find specific emails in your Gmail account, this blog offers a practical, systematic, step-by-step walkthrough to help check the possibilities and the locations related to the missing messages, locate missing communications, restore your account settings, and get your Gmail back in order.

Before beginning, it is important to clarify one important detail. 

“Are existing emails missing, or are new emails not arriving?”

Because when existing messages go missing, we need to explore a different set of possibilities than for cases where new messages don't arrive in your Gmail inbox.


Step 1: Check under Spam and Trash

It's one of the most common reasons. Emails may be automatically diverted to Spam or manually/accidentally deleted to Trash. Both locations are hidden from the Inbox view.

  1. Open Gmail on a computer.
  2. On the left side of the page, click More.
  3. Select Spam. Look for the missing email. If found, select the message and click Not spam to bounce it back to your inbox.
  4. Select Trash. If the email is in Trash, select the message and click Move to Inbox (or Keep in Inbox).

Step 2: Check All Mail

If your email isn't in Spam or Trash, there's a good chance it was just archived. The All Mail contains message in your Gmail that are not under Spam and Trash, including those that have been archived and removed from the Inbox view.

  1. On the left side of the Gmail interface, click More.
  2. Click All Mail. Every single message in your account is here.
  3. Use the scroll bar or the search bar to locate the missing communication.

Step 3: Use Advanced Search Operators

Gmail search is powerful, but standard searches using basic search "chips" below the search box may exclude the Trash and Spam locations. To search your entire account, use specific operators.

  1. In the search box at the top, type your search criteria followed by in:anywhere. For example: from:sender@example.com in:anywhere. This expands the search to include messages in Spam and Trash, which may not appear in a normal Gmail search.
  2. Use has:attachment to narrow results if the missing email included a file attached.
  3. Search by date ranges using after:YYYY/MM/DD or before:YYYY/MM/DD to pin down a specific timeframe.
  4. Ensure there are no typos in the email addresses or keywords used in your search query.

Step 4: Review Filters and Blocked Addresses

A filter created previously may be automatically archiving or deleting incoming emails without your knowledge, making them skip inbox or directing them to Trash.

  1. Click the Settings gear icon in the top right and select See all settings.
  2. Navigate to the Filters and Blocked Addresses tab.
  3. Look for active filters that include actions like "Delete it" or "Skip the Inbox (Archive it)."
  4. If you find a filter affecting the missing messages, click Edit or Delete next to that filter.

Finally, review the email addresses listed under the Blocked Addresses section to check if emails from an address that is persistently getting diverted to Spam are listed there. If so, unblock that email address and be sure to click on the Save changes button at the bottom of the page, if required.


Step 5: Check Forwarding and POP/IMAP Settings

If you have your emails forwarded to another email address or access your email through an email client (like Thunderbird, MS Outlook, or Apple Mail), actions such as deleting or archiving through Gmail's Forwarding or POP/IMAP settings in Gmail or in the client may also affect the messages stored in Gmail.

  1. Go to Settings and select See all settings.
  2. Click the Forwarding and POP/IMAP tab.
  3. In the Forwarding section, verify if messages are being forwarded and check if "delete Gmail's copy" is selected.
  4. In the POP download section, check the setting for "When messages are accessed with POP." Ensure it is not set to "delete Gmail's copy in the Inbox."
  5. In the IMAP access section, ensure that "Auto-Expunge" settings are configured to your preference to avoid unexpected deletions.

Step 6: Use the Gmail Message Recovery Tool

If you've searched everywhere and suspect your messages were permanently deleted from the Trash folder, they are usually gone forever. However, if your messages went missing due to unauthorized access, account compromise, or a technical error, the official Recovery Tool may help.

  1. Navigate to the official Gmail Message Recovery Tool website.
  2. Confirm the account information displayed on the screen.
  3. Click Continue and follow the on-screen instructions to request Gmail to check for recoverable messages.

Step 7: Check Third-Party Email Client Auto-Archiving Rules

If you use local desktop email clients (such as Microsoft Outlook, Apple Mail, Spark, or Postbox) check whether it has rules, filters, cleanup actions or account settings that move, archive or delete messages. With IMAP, actions performed in the client can synchronize with Gmail.

To resolve this, check the auto-archive, clean-up, or synchronization settings in your email client to ensure they are not set to delete or clear messages from the server.

If missing messages are located within a local auto-archive folder, you can restore them to the Gmail server using IMAP synchronization. In your email client, select the relevant messages or folders and move or copy them back into your main Gmail Inbox or All Mail folder. Ensure that IMAP synchronization is active so that these changes sync back to the Gmail server and reflect across all your devices.


Step 8: Check Cloud-Based Email Backup and Archiving Services

Third-party cloud backup, cleaning, or automation services (such as automated cloud scripts, email cleaning tools like Clean Email or Mailstrom, or connected cloud backup utilities) can automatically archive, organize, or delete emails from your Gmail address based on user-configured rules running via OAuth or IMAP permissions.

Managing Connected Services

  1. Go to Google Account Settings > Security > Third-party apps with account access.
  2. Review the permissions granted to connected tools and revoke access for any service automatically deleting or archiving your emails.
  3. Check active rules, cleanup filters, or sync options within any connected backup or cleaning app's dashboard.
Somnath Datta profile picture

About Somnath Datta

Somnath is a Google Diamond Product Expert specializing in Gmail and Google Accounts. He is also a Mentor for new volunteers and Product Experts in both those forums. He regularly shares technical guides, troubleshooting advice, and step-by-step solutions to help users better navigate and resolve Gmail and Account issues efficiently.

Wednesday, September 23, 2026

Email Authentication and Handling Unsolicited Emails in Gmail Inbox (2026 Edition)

Understanding Email Authentication: How to Verify Senders and Protect Your Inbox

In today's age, digital communication is central to everyday life, and email remains paramount among all mediums.

Still, there are dangers and threats as cybercriminals frequently manipulate email headers and impersonate individuals and trusted domain names to deceive recipients into sharing sensitive information.

Understanding the mechanics of email authentication can be an important line of defense against phishing attacks and email-based fraud.

If you are suspicious about an email, any email, you can start by reviewing the Gmail Support Article on Email Authentication: https://support.google.com/mail/answer/180707.


1. The Technical Pillars of Email Security

Email authentication relies on technical standards designed to help verify that an incoming message was authorized by, or cryptographically associated with, the domain represented in the message.

SPF helps authenticate the domain associated with the sending infrastructure.

DKIM verifies a cryptographic signature associated with a sending domain.

Gmail displays these results as Mailed by and Signed by field values for easy comparison and identification. While these indicators are useful clues, they do not by themselves prove that the visible sender identity is trustworthy.


2. Gmail and DMARC

Gmail uses DMARC (Domain-based Message Authentication, Reporting, and Conformance) as part of its email authentication process. DMARC helps receiving mail systems detect messages that fail authentication and alignment checks for a domain, and allows domain owners to publish instructions for handling those messages. This can significantly reduce certain types of domain spoofing used in phishing and fraud.

When an email is sent to a Gmail address, inbound mail systems perform authentication and other checks on the message:

  • SPF Check: Verifies if the sending server's IP address is authorized by the domain owner in their DNS record.
  • DKIM Check: Uses cryptographic keys to verify that the message has a valid digital signature associated with the sending domain and that signed portions of the message have not been altered.
  • Identifier Alignment: DMARC requires alignment. Gmail checks whether the domain visible in the From: header matches either the SPF envelope sender (Return-Path) domain or the d= domain parameter in the DKIM signature. If neither protocol aligns, the DMARC check fails.

If a message fails DMARC authentication, the receiving system can apply the sending domain's published DMARC policy to determine how the message should be handled:

DMARC Policy Actions

  • Policy p=none (Monitoring): The domain owner requests no specific enforcement action for DMARC failures and can use reporting to monitor authentication results.
  • Policy p=quarantine (Increased Scrutiny): The domain owner asks receiving systems to treat failing messages as suspicious—for example, by placing them in spam or otherwise subjecting them to increased scrutiny.
  • Policy p=reject (Strong Enforcement): The domain owner asks receiving systems to reject messages that fail the applicable DMARC checks.

3. Spotting the Warning Signs

You can refer to the Gmail Help Center for guidance on identifying extra indicators next to the sender's name to assess message genuineness: https://support.google.com/mail/answer/1311182?hl=en-GB.

Always check message headers to make sure the From: header isn't showing an incorrect name or spoofed address: https://support.google.com/mail/answer/29436. 

Inspecting the full email headers provides detailed information about the message's routing and authentication results.

To view authentication details in Gmail, open the message and click the three-dot More menu, then select “Show original.” Gmail displays authentication results, including SPF, DKIM, and DMARC, along with the message's full headers.

Review Google's additional tips to avoid and report phishing emails: https://support.google.com/mail/answer/8253?hl=en-GB. Reporting suspicious messages directly within your email client helps email service providers improve automated filtering algorithms globally.


4. Best Practices for Inbox Safety

To maintain robust security, always combine technical authentication checks with vigilant online behavior:

  1. Inspect Every Link: On a desktop or laptop browser, hover over links before clicking to verify the destination URL. On a mobile app, long press on the link to inspect the destination URL. If you are still unsure, you can use a URL-checking service you trust as an additional precaution. Do not treat a clean result as proof that a link is safe. If you remain unsure, don't open the link.
  2. Be Wary of Urgency: Phishing emails often create artificial panic by asking you to reply immediately to force hasty decisions.
  3. Verify Authenticity: When in doubt, contact the sender through a known independent communication channel such as a verified phone number or separate address.

By staying informed about authentication mechanisms like SPF, DKIM, and DMARC, and exercising caution with unverified messages, you can navigate your inbox securely.

Somnath Datta profile picture

About Somnath Datta

Somnath is a Google Diamond Product Expert specializing in Gmail and Google Accounts. He is also a Mentor for new volunteers and Product Experts in both those forums. He regularly shares technical guides, troubleshooting advice, and step-by-step solutions to help users better navigate and resolve Gmail and Account issues efficiently.

Thursday, September 17, 2026

How did this email reach my Gmail address?

Understanding Email Movements

Many users manage multiple personal email addresses. One of the most frequent questions brought to the Gmail Help Community is: "How did an email intended for my Account X end up in my personal Gmail account?"

Understanding email routes helps you identify redirected messages and control incoming mail delivery. 

Some scenarios explain how Gmail received the message, while others explain how your Gmail address was involved in the message or its subsequent replies.


Analyzing Email Headers: The Best Technical Tool

Analyzing the original email header is one of the most precise ways to determine how an email reached your Gmail account.

To inspect routing details, you must first view the message headers. Google provides an official guide detailing how to view full headers across common email services.

Focus your inspection on routing-specific header fields: Delivered-To, X-Forwarded-For, X-Apparently-To, and overall Received lines.


1. Emails Forwarded from Account X to Gmail

Forwarding configuration can be verified inside Account X settings or through targeted header inspection. Depending on the provider and forwarding path, you may find the following header information:

  • Gmail Source Accounts: Look for the X-Forwarded-For field to view Account X details, or inspect X-Forwarded-To to confirm your target Gmail address.
  • Microsoft / Hotmail Accounts: Forwarded messages generally include a Resent-From header line instead of X-Forwarded-For.
  • Yahoo & AOL Accounts: Yahoo and AOL handle forwarding routines differently across account types. Check your external account settings directly to verify if auto-forwarding is enabled.

2. Emails Fetched via POP3

You can check if Gmail is fetching emails from external personal accounts via POP3 by opening your Accounts and Import Settings tab and checking Check email from other accounts.

Inspecting the raw header for the X-Gmail-Fetch-Info field confirms POP3 retrieval activity.


3. Emails Fetched via Gmailify

Gmailify lets non-Gmail personal accounts (like Yahoo, Outlook, or Hotmail) link directly to your Gmail account to utilize Gmail's spam protection without changing addresses. Check whether Gmailify is linked under Accounts and Import Settings.


Depending on the message and provider, header fields such as the X-Apparently-To field may identify Account X as the original destination. 


4. Emails Fetched via ShuttleCloud API

ShuttleCloud handles automatic message and contact imports when migrating external webmail accounts into Gmail. You can review active import states under Accounts and Import Settings.

Searching for X-Apparently-To inside the header may help identify if the message arrived via a ShuttleCloud import migration.


5. Gmail Listed as a Reply-To Address

If someone sends an email from Account X, they may have specified your Gmail address as their designated Reply-To address. While incoming original messages remain unaffected, any recipient replying to Account X will deliver responses straight into your Gmail account.

If Account X is managed within Gmail, review the Send mail as section in Accounts and Import Settings to adjust default reply paths.


6. Included as a BCC Recipient

Bcc recipients are deliberately hidden from the other recipients' visible To/Cc fields. So, when you are Blind Carbon Copied (BCC), your email address will not appear on the visible To: or Cc: header fields. Routing detection depends on the sender's mail provider:

  • Sent from Gmail: Open the message dropdown header menu in Gmail. A dedicated Bcc: field displaying your address will be present.
  • Sent from Yahoo or AOL: Search for a for clause within the Received: header lines to identify your BCC destination address.
  • Sent from Hotmail / Outlook: Microsoft mail transfers generally strip BCC recipient headers. If no Bcc: or for line is present, confirm directly with the sender.
Somnath Datta profile picture

About Somnath Datta

Somnath is a Google Diamond Product Expert specializing in Gmail and Google Accounts. As a Community Mentor, he writes technical solutions to help consumers understand personal account security and email routing dynamics.

Tuesday, September 15, 2026

About Gmail Android app notifications.

Gmail App Notifications on Android

This is one of the common issues reported in the Gmail Help Community. This guide, along with the relevant screenshots, should provide affected users with the information they need to troubleshoot Gmail notification issues and, in many cases, resolve them.

Once Sync Gmail is confirmed to be enabled, this will be a three-part troubleshooting process. The parts are mentioned below:


1. Android notification settings

  • Tap on the Settings app on your device.
  • Locate and tap on the Notifications option.
  • Under Manage tap on App Notifications.
  • Check that notifications for Gmail are enabled.

With Android's notification settings checked, let's move on to Gmail's own notification settings.


2. Gmail app notification settings

  • Tap to open the Gmail Android app.
  • Tap the Menu icon at the top left.
  • Scroll down and tap on the Settings option to see the different options.
  • Tap the General settings option and thereafter, tap on Manage notifications.
  • Ensure the Gmail notifications option is enabled.

We have now completed two out of our three-part process.


3. Gmail address notification settings

  • Tap to open the Gmail Android app.
  • Tap the Menu icon at the top left.
  • Scroll down and tap on the Settings option.
  • Tap on the email address you want to set notifications for.

It will open up these options:

  • First, we ensure the Email notifications are set to All (and not set to High Priority Only). High Priority is not about emails marked as important. Gmail uses its automated systems to identify messages that it considers important enough to notify you about. If Gmail doesn't classify a message as high priority, you may not receive a notification for it when High Priority Only is selected.
  • Tap Inbox notifications and make sure the options are enabled as shown in the screenshot below.
  • We then tap on Manage labels. It shows all system and user-created labels and the number of days they are set to sync.

  • Before enabling notifications for a label, make sure that the label is synchronized. Tap the label and check its Sync messages setting. Gmail requires messages for a label to be synchronized before notifications can be enabled for that label.

  • I have used Primary as an example. We tap on each label we wish to receive notifications for and ensure the options shown under Notifications are checked. Remember to repeat these steps for each label for which you want to receive notifications.
  • If you want Gmail notifications to play a sound, tap Notification sounds and make sure an appropriate sound is selected for email notifications.

With these three notification levels checked, the main Gmail notification troubleshooting process is complete. These steps should resolve many Gmail notification issues on Android.

Somnath Datta profile picture

About Somnath Datta

Somnath is a Google Diamond Product Expert specializing in Gmail and Google Accounts. He is also a Mentor for new volunteers and Product Experts in both those forums. He regularly shares technical guides, troubleshooting advice, and step-by-step solutions to help users better navigate and resolve Gmail and Account issues efficiently.

The Gmail "dots" phenomenon (2026 Edition)

The Gmail "Dots" Issue Explained

Even though it has been more than a decade and a half since Google launched Gmail, users regularly post about receiving emails intended for someone else, addressed to a dot (or the dotless) variant of their username and wonder if the other person is receiving their emails in turn as well. So, it won't be unfair to say that the Gmail "dots" issue is still one of its most misunderstood features.

This blog is my take on this issue. I have shared all relevant information that is known to me on this issue through three section guides detailing what the issue is in reality, common rebuttals, and practical self-tests you can perform to dispel any doubts.


1. The Reality of the Issue: What Exactly Happens?

What happens is the simple act of someone (say Person A) giving out an email address that they incorrectly think is theirs, but in reality, belongs to someone else (say Person B).

In almost all cases, both share the same first and last names as this confusion seems to happen most with such usernames. When that happens, emails intended for Person A get sent to Person B in much the same manner as phone calls or letters intended for Person A will reach Person B if the phone number or street address of Person B was given out by Person A instead of their own.

Just as the sharing of the phone number or street address was an error on the part of Person A and didn't make Person B's phone number or street address theirs; similarly, the sharing of Person B's email address by Person A or someone else is an error on their part and does not make Person B's email address theirs.

Prior to Gmail, other free email providers would count the period "." as a character, which meant that username@domain.com would be a separate username from user.name@domain.com.

But that doesn't happen with Gmail. When Gmail arrived on April 1, 2004, they introduced several new concepts in email, such as Labels instead of Folders, Search instead of Sort, and Grouped messages (Conversations) instead of ungrouped ones. Additionally, they chose to ignore case and dot variants of a username.

What that meant was, when someone registered a Gmail username, they also owned all possible dot variants (and one dotless variant) as well as all possible upper/lower/mixed case variant aliases of that registered username, leaving no way for anyone else to subsequently register any of those variants.


2. The Common Rebuttals

"This is something introduced later and was not the case when Gmail was launched."

Many users dispute that this wasn't the case when Gmail was launched. Here is a screenshot of one of the earliest recorded references of the feature from Errorik's Archive (April 2004), written a month after Gmail's launch, highlighting this exact behavior:

"My account is username@googlemail.com and I'm receiving emails sent to username@gmail.com"

Due to legal reasons, Google offered the @googlemail.com domain in the UK and Germany for the first few years after launching Gmail in 2004. Usernames registered under @gmail.com were made unavailable from being registered under @googlemail.com and vice-versa. By blocking all those aliases as available options for a separate username, Gmail prevents what would otherwise be an easy way to impersonate someone.

As a consequence, besides owning all possible dot variants and the dotless variant of their username, a user also owns the username@googlemail.com alias for their registered username@gmail.com address. All incoming emails addressed to any dot/dotless variant, regardless of the @gmail.com or @googlemail.com suffix, deliver directly to the same inbox.

This can be corroborated by looking at the message headers for any incoming emails received at your @googlemail.com address, as detailed in the self-tests section below.


3. The Self-Tests: The Proof of Impossibility

There is no better way to be convinced than by running the tests yourself. Assuming for a moment that username@gmail.com and user.name@gmail.com were two separate Gmail accounts:

  1. Attempting to register a dot or case variant:

    If they were separate, it would be possible to register dot/dotless/case variants after creating an account. However, attempting to register any variant displays an error that the username is unavailable:

  2. Signing in with dot variants:

    You can sign into your account using any dot, dotless, or case variant alongside your normal password. Clicking the circular profile icon in the top-right will always display your primary registered address, confirming that all variants point to the exact same account.

  3. Forwarding emails to a dot variant:

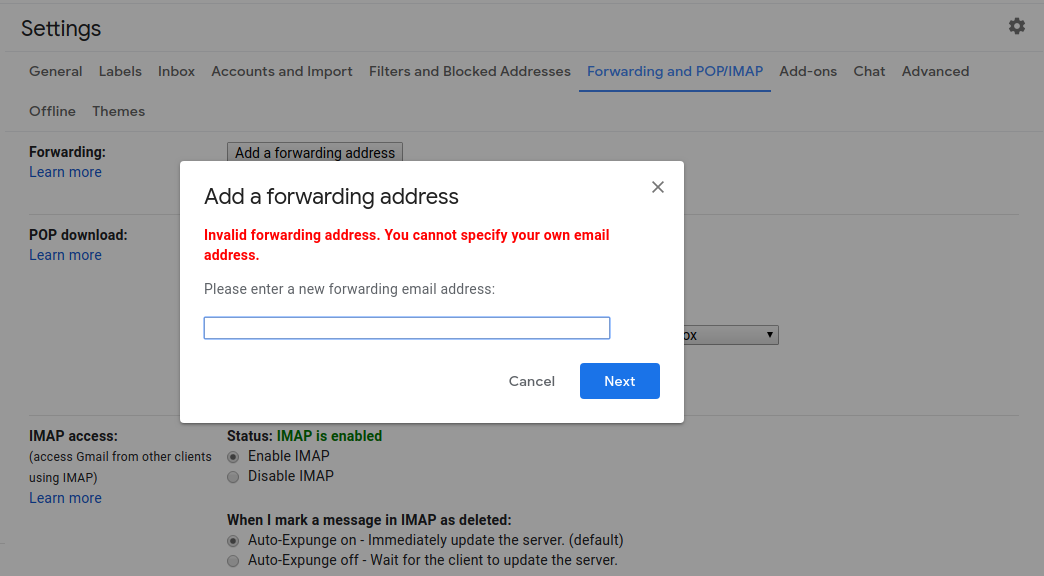
    Attempting to forward messages from your primary Gmail username to any of its dot or case variants will immediately trigger an explicit forwarding error:

  4. Adding dot variants to "Send mail as":

    Normally, adding an external address under Gmail's "Send mail as" settings requires a verification step:

    However, when adding a dot variant or @googlemail.com version of your own address, no verification email is required. Clicking "Next Step" immediately adds it as a usable sending alias:

  5. Inspecting header routing (Googlemail vs. Gmail):

    Open an email sent to your username@googlemail.com address, click the three-dot menu, and select Show original. Comparing the headers shows that while To lists @googlemail.com, Delivered-To displays your primary @gmail.com address, proving both routings terminate in the exact same inbox.

Finally, there is the complete absence of proof. In all these years, there has been zero documented proof that username@gmail.com and user.name@gmail.com exist as two separate Gmail accounts.

Somnath Datta profile picture

About Somnath Datta

Somnath is a Google Diamond Product Expert specializing in Gmail and Google Accounts. He is also a Mentor for new volunteers and Product Experts in both those forums. He regularly shares technical guides, troubleshooting advice, and step-by-step solutions to help users better navigate and resolve Gmail and Account issues efficiently.

How Gmail works (2026 Edition)

How Gmail Works

When folks come to Gmail for the first time, they instinctively expect it to work in exactly the same way as the traditional email services and desktop email clients they have grown used to.

But when Google created Gmail back in 2004, they had an opportunity to redefine email and how it worked from the ground up. So—being Google!—they did.

The result is a sleek and efficient email management system: no physical folders and no separate copies of a message simply because it is associated with different labels. Instead, Gmail organizes messages using labels, Search, threaded conversations, and other built-in features. Messages can be accessed through system labels such as Inbox and All Mail, while Spam and Trash are handled separately. But because this model differs from what most people know, it can and still does lead to confusion.


1. Labels Not Folders: The Core Storage Model

The chief source of confusion is the way Gmail organizes messages. Many users are accustomed to splitting their mail into separate folders according to subject, making copies where necessary, and deleting a message from one folder without affecting what appears elsewhere.

Gmail, on the other hand, doesn't put messages in subject folders—it puts subject labels on messages. And that's a whole new ballgame!

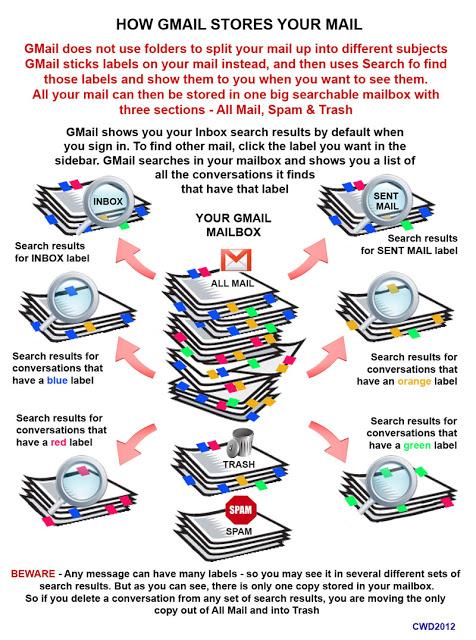
Gmail Single Mailbox and Search Result View Diagram

Gmail adds system labels like Inbox, Sent, and Important. Users add their own custom labels like Work, Vacation, Football, or Family. To see the messages associated with a label, click the label name in the sidebar. Gmail displays the messages associated with that label.

Because each message can carry multiple labels, the same message may appear in several label views. This can create the impression that duplicate messages exist, when the different views are simply showing the same message with different labels.


2. Common Pitfalls & Things Which Go Wrong

Deleting Sent Messages or Conversation Threads

In traditional folder-based email clients, users may think of a message in Sent as a separate copy stored in a Sent folder. Gmail does not work that way. A message can be associated with system labels such as Sent and Inbox, but those labels do not represent separate copies of the message. When you delete a message, it is moved to Trash and is no longer available under its other labels.

Deleting Messages After Replying or Categorizing

Some users reply to a message, apply a project label, and then delete the message from their Inbox expecting the labeled version to remain. In Gmail, labels do not create separate copies of a message. Deleting the message moves it to Trash, so it is no longer available under its other labels. If you want to remove the message from the Inbox while keeping it available under its labels, archive it instead.

Remember: Messages in Trash and Spam are automatically deleted after 30 days.


3. Best Practices for Using Labels

Managing your mailbox with labels is fast, flexible, and completely customizable:

  • Applying Labels: Use Gmail's label controls to apply a label to selected messages, or use the available drag-and-drop options where supported.
  • Move to Label: The “Move to” option can move a message from the Inbox to a selected label, removing it from the Inbox in the process.
  • Color Coding & Visibility: Use the options available for a label in the Gmail sidebar to customize its color and visibility.
  • Nesting Labels: Organize related sub-topics by creating nested child labels under a parent label for a cleaner sidebar layout.
  • Deleting Labels Safely: If you delete a custom label you created, no emails are deleted. The label is removed, but the messages remain in Gmail and can still be found through other applicable labels, Search, or All Mail.
Somnath Datta profile picture

About Somnath Datta

Somnath is a Google Diamond Product Expert specializing in Gmail and Google Accounts. He is also a Mentor for new volunteers and Product Experts in both those forums. He regularly shares technical guides, troubleshooting advice, and step-by-step solutions to help users better navigate and resolve Gmail and Account issues efficiently.