Many times we have to encounter a situation where we discuss the best way to allow someone access to our accounts or on ways to best share an email inbox across multiple users.
In most cases, the solution to the above-mentioned problems is to leave the password with the users; even though we are worried about a couple of important things - (a) it is not a secure way of doing things and (b) there is always the threat of the system finding those access suspicious and blocking them.
One way to resolve these types of issues is through Email delegation - a process through which you can grant access to a Gmail account by adding a delegate who can read, send, and delete messages from that account. It dispenses with the sharing of password and reduces the possibility of the system finding access to the account suspicious and blocking it. It doesn't completely remove the possibility because each Gmail account is intended and designed for use by an individual user. If you have multiple users frequently accessing the same account from various locations, you may reach a Gmail threshold and your account will be temporarily locked down.
This blog will have four sections related to:
- Allowing access to a delegate account
- Accessing the source account from the delegate
- How a sent email appears to the recipient
- Revoking access
Allowing access to a delegate account
The process begins by allowing access to the delegate from the source account. For that, sign into the Gmail account you wish to allow the delegate to access, visit the Accounts and Import tab, scroll down to the section that reads Grant access to your account and click on the Add another account link.

Once you click on that link, you'll be presented with a pop-up window to set up the delegate. All it requires is that you enter the email address you wish to set up as delegate; so be careful about correctly entering it.

Correctly enter the email address of the delegate and then click on the Next Step button.

Confirm the email address is correct and click on the Send email to grant access button. Once clicked, you'll briefly see the following screen.

The delegate, in their account, will receive the following email from the Gmail Team

Simply click on the link and then click on the Confirm button in the next page to accept the invite and create a delegate.
 Once a delegate accepts the invitation, in the source account, one can see a mention of the delegate email address and the status displayed as "accepted".


You will also notice this pink banner across the top of your Gmail inbox for a week.
Accessing the source account from the delegate account
Following the acceptance of the delegate invite, whenever the delegate signs into his account, he is also signed into the source account as a delegate. For easy recognition, a (delegated) tag is displayed against that account when one clicks on the circular profile image in the top-right corner of the screen.

Accessing from a delegated account, the source account appears different than how it would otherwise be.
- The theme selected on the actual account doesn't carry over.
- Instead of the circular profile picture on the top-right corner, the email address of the source account is displayed.
- No Hangouts Chat.
- Settings are only available for some options.

How a sent email appears to the recipient
To a Gmail recipient, an email sent from via the delegate account includes both from and sent-by references in the mail UI itself. This allows the recipient to understand that while the email was sent from the source account, but it was sent via a delegate. Here is a screenshot:

For non-Gmail recipients (AOL, Outlook, and Yahoo), it only shows the email address it was sent from - the source account - but without any reference to the delegate account in the mail UI even though the message header included details of the delegate account under the Sender and X-Google-Sender-Delegation fields.
Revoking access
Access to a delegate account can be removed from either the source account or the delegate account.
From the source account, visit the Accounts and Import tab, scroll down to the section that reads Grant access to your account and click on the delete link next to accepted, then click on the blue OK button to confirm the deletion.

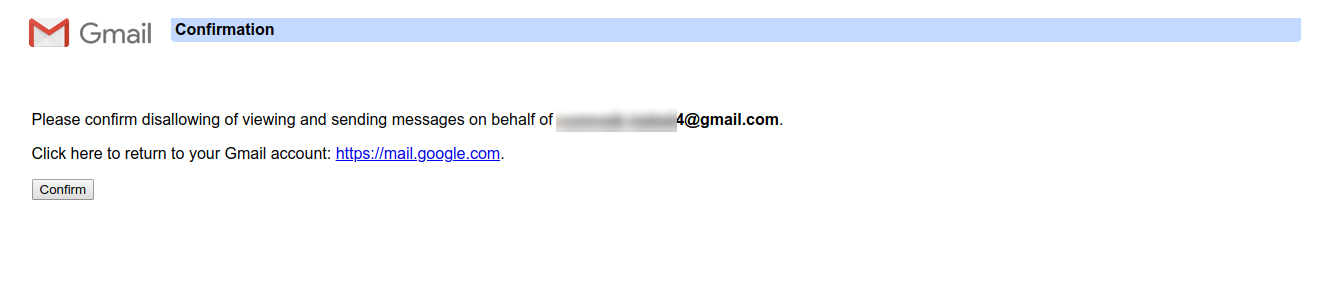
From the delegate account, click on the link highlighted below and then click on the Confirm button in the next page to confirm disallowing of viewing and sending messages on behalf of the source account.


Finally, a list of can and can't:
Delegates can:
Revoking access
Access to a delegate account can be removed from either the source account or the delegate account.
From the source account, visit the Accounts and Import tab, scroll down to the section that reads Grant access to your account and click on the delete link next to accepted, then click on the blue OK button to confirm the deletion.

From the delegate account, click on the link highlighted below and then click on the Confirm button in the next page to confirm disallowing of viewing and sending messages on behalf of the source account.

Delegates can:
- Send or reply to emails that were sent to you
- Read messages sent to you
- Delete messages sent to you
- Chat with anyone for you
- Change your Gmail password
Comments
Post a Comment
Please do not post spam or promote your own site(s). All comments are moderated and such comments will not be published.
Also, please keep your comment relevant to the topic of the article.
Finally, please do not post any of your personally identifiable information such as phone number, email address or other important details as this is an open platform.