Recently, the Gmail Help Community has received quite a few queries on this topic involving AOL, Yahoo!, and Outlook accounts. As an attempt towards making the users more comfortable by making the process more visual for them using screenshots, this three-part blog aims to explore the three inbuilt Gmail processes through which one can bring over emails from another account over to a Gmail account. Following the first part where we looked at how to bring over emails from an AOL account, we shall look at how we can bring over emails from a Yahoo! account in this second part. The final part will be on how to bring over emails from a Hotmail account.
It is best to mention it upfront that like my AOL account, my Yahoo! account also has 2-step verification enabled. If you would like to enable it for your Yahoo! account, refer to instructions here: https://help.yahoo.com/kb/add-two-step-verification-extra-security-sln5013.html.
If you do not have 2-step verification to your Gmail account, but want to add it, you can do so by following the steps included in this help article: https://support.google.com/accounts/answer/185839?co=GENIE.Platform%3DDesktop&hl=en&oco=0.
Gmail has the following built-in options to bring over emails from other accounts:
- The POP3 fetch.
- Gmailify (using the IMAP protocol).
- Import (using the ShuttleCloud API).
As POP3 and Gmailify have the same initial steps, we are going to look into those two options to start with. POP3 first, then Gmailify.
To start the POP3 process, we click on the Add an email account link in the Check email from other accounts section.
Then we enter the email, the Yahoo! address and click on the Next button.
We select the POP3 option and click Next.
We are then asked to enter the password for the Yahoo! account and make some other selections. As the account has 2-step verification enabled, entering the regular password for the Yahoo! account got me the following error message.
Note: At this point, the Gmail account is set to fetch emails from the Yahoo! account. If this is all you need, select the No option and click Next to finish the setup process.
As I also wanted to add the Yahoo! address as a "Send mail as" option, which is the best thing to do under certain circumstances. So, I selected the Yes option and clicked on the Next button.
You now need to include the details of the Yahoo! SMTP server. The server name and the username will be filled in by default and you just need to put in the password. As this account has 2-step verification enabled, I used the same application-specific password I used to set up the POP3 server.
Note: In some situations, you may receive an error message WRT the Port number. If that happens, change the Port number to 465 and TLS to SSL. Then click on the Add Account button.
We are almost finished at this point. All that needs to be done is to check the Yahoo! inbox for an email from the "Gmail Team" titled "Gmail Confirmation - Send Mail as username@yahoo.com" containing the 9-digit confirmation code and follow the instruction included therein.
After clicking the link in the email or entering the code in the box and clicking on the Verify button in the window above, we can now see the Yahoo! account added as both Check email from and Send mail as options.
We begin the Gmailify process from the window where we select that option.
Clicking on the Next button brings up the Yahoo! sign-in page where it requires entering the Yahoo! username, the regular password for that username, and approve the necessary permissions for Gmail in successive pages.
That done, you should receive the following confirmation window:
And closing it, see the Yahoo! account added as both Check email from and Send mail as options.
Now we look at the third option, the Import feature, by clicking on the Import mail and contacts link as shown below.
The first screen asks to enter the complete Yahoo! address and the following screen provides some important information related to the Import process. Read them carefully before clicking on the Continue button.
The Yahoo! sign-in screen arrives, followed by the password screen, and the screen containing the necessary access permissions for ShuttleCloud Migration.
Clicking on the blue Agree button displays the Authentication successful message.
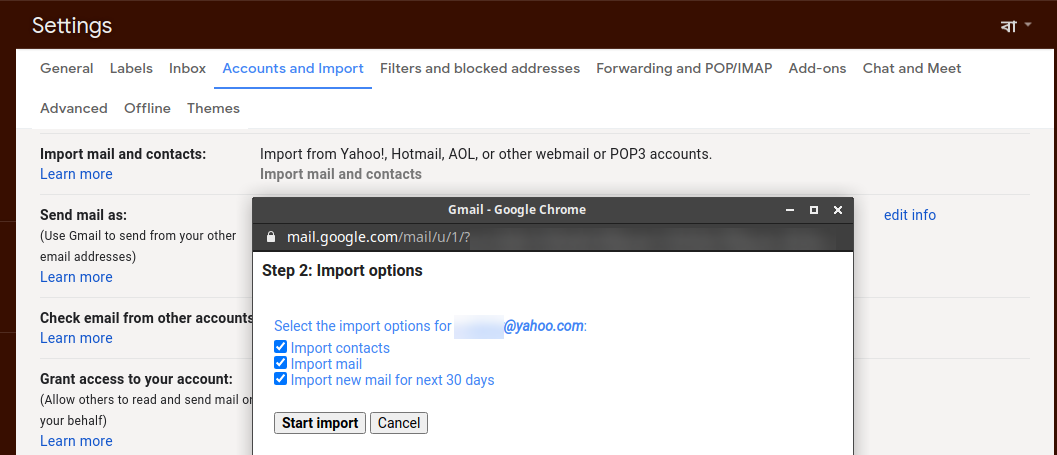
Closing that window returns us to the Import options pop-up window. This time, I have chosen to Import everything. So, I leave everything as-in (checked) and click on the Start Import button.
That's it. It shares some important details and starts the import process.
Once the pop-up window is closed, the details of the imported account is displayed in the Import mail and contacts section. Since it also adds the account as a Send mail as option, a reference is also displayed in that section as well.
As with the first blog, if you want me to include any other scenarios, please let me know in the comments and I shall be happy to enhance this article.


Comments
Post a Comment
Please do not post spam or promote your own site(s). All comments are moderated and such comments will not be published.
Also, please keep your comment relevant to the topic of the article.
Finally, please do not post any of your personally identifiable information such as phone number, email address or other important details as this is an open platform.