Update on April 2019: I am reviewing my older blogs for possible updates and realized this one lacked screenshots from Android and iOS devices. So, I am updating this blog with the relevant screenshots and some necessary details.
The process is very simple. Click on Compose as you would for any regular email. Then click on the icon as is shown in the picture below.

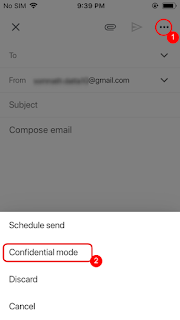
In your Gmail Android app, click on the 3-dot (more) menu at top right, and from the options, click on Confidential Mode.


Ditto on your Gmail iOS app.
Clicking on the icon (or selecting the Confidential mode option in the Gmail mobile app) will open up a window/screen where you would need to decide on the length of the expiry and if the email sent would require an SMS passcode to open or not. Remember that these settings impact both the message text and any attachments.


Google explains Gmail's Confidential Mode as where the recipients will not have the option to forward email contents, copy/paste, download, nor print. You can use these options to protect sensitive information. When you send the email, your recipient will get a notification about the limits you've selected.
The process is very simple. Click on Compose as you would for any regular email. Then click on the icon as is shown in the picture below.

In your Gmail Android app, click on the 3-dot (more) menu at top right, and from the options, click on Confidential Mode.


Ditto on your Gmail iOS app.

Clicking on the icon (or selecting the Confidential mode option in the Gmail mobile app) will open up a window/screen where you would need to decide on the length of the expiry and if the email sent would require an SMS passcode to open or not. Remember that these settings impact both the message text and any attachments.
- If you choose "No SMS passcode," recipients using the Gmail Web UI/app will be able to open it directly. Recipients who don't use Gmail will get emailed a passcode.
- If you choose "SMS passcode," recipients will get a passcode by text message.

Once you have made your selection, click on the blue Save button. Then note how the appearance changes as is indicated in the image below.

The screens on your Gmail Android and iOS apps respectively:


Ensure the details mentioned are correct. If required, use the Edit link to make corrective changes in Confidential Mode settings. Then, Draft your email as usual and click on the blue Send button.

Now all you need to do is (a) confirm the email address the email is being sent to, (b) enter the phone number (if you have previously selected SMS passcode) and (c) click on the blue Send button.
The final screen, as it appears in the Gmail Android and iOS apps:


Comments
Post a Comment
Please do not post spam or promote your own site(s). All comments are moderated and such comments will not be published.
Also, please keep your comment relevant to the topic of the article.
Finally, please do not post any of your personally identifiable information such as phone number, email address or other important details as this is an open platform.